ℹ Introduction for General User
Welcome to Stilly. Stilly is a structured personal logging app that allows users to record daily entries, review trends, and export their data. This guide outlines the main features to assist with the review process.
Following core features:
- Blood Pressure Logging (SYS / DIA / Pulse entry and history view)
- Blood Glucose Recording
- Body Temperature Tracking
- Blood Oxygen (SpO₂) Logging
- Weight and BMI Calculation
- Body Measurement Recording
- PDF Export Function
- Reference Range Display (informational only)
- Full Offline Operation
- Local-Only Data Storage (no cloud sync)
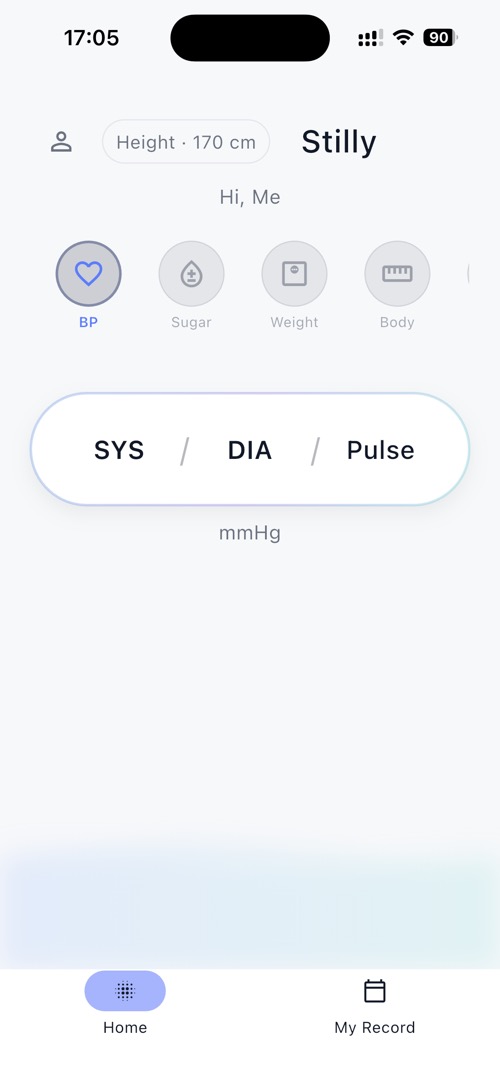
1 Exploring the Home Screen
Start by familiarizing yourself with the main dashboard and navigation.
- Launch Stilly to see the home dashboard
- At the top, view your profile icon and basic information
- Select a measurement category (BP, Sugar, Weight, Body) from the icon row
- The main card displays the latest reading for the selected category
- For Blood Pressure, SYS / DIA / Pulse values are shown together
- Use the bottom navigation bar to switch between Home and My Record
Reviewer Tips
The Home screen displays a summary of the selected measurement type. Tap different category icons (BP, Sugar, Weight, Body) to switch between metrics and confirm that the displayed values update accordingly.
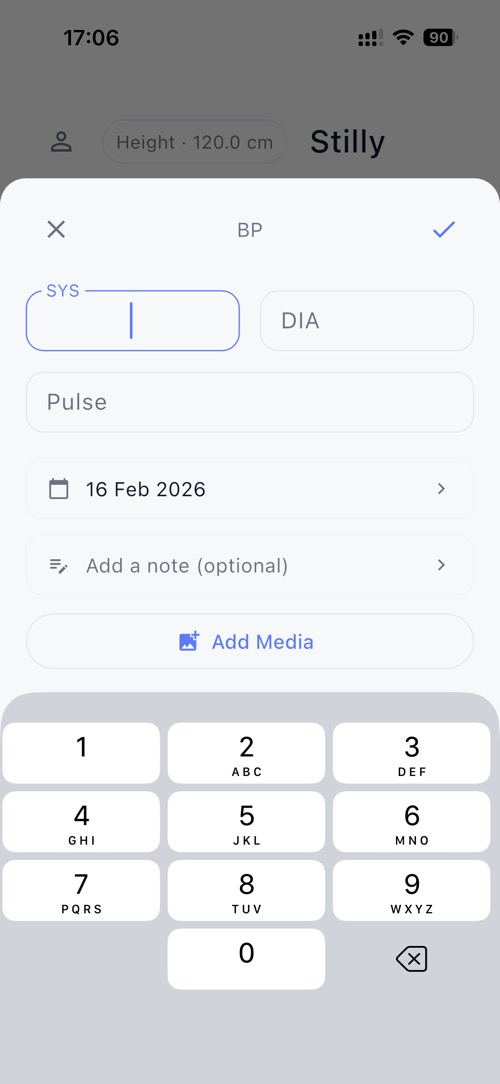
2 Logging Blood Pressure
Test the blood pressure input flow using the BP card.
- From the Home screen, tap the BP card
- A bottom sheet input panel will appear
- Enter systolic value (e.g., 120)
- Enter diastolic value (e.g., 80)
- Enter Pulse (optional)
- Select the date if needed
- Optionally add notes or media
- Tap the ✓ button to save
- The saved reading will appear in your history with a timestamp.
Reference Ranges:
The app displays informational reference categories (e.g., Optimal, Normal, High-normal, Elevated) to provide context for recorded values. These ranges are for reference only and do not constitute medical advice.
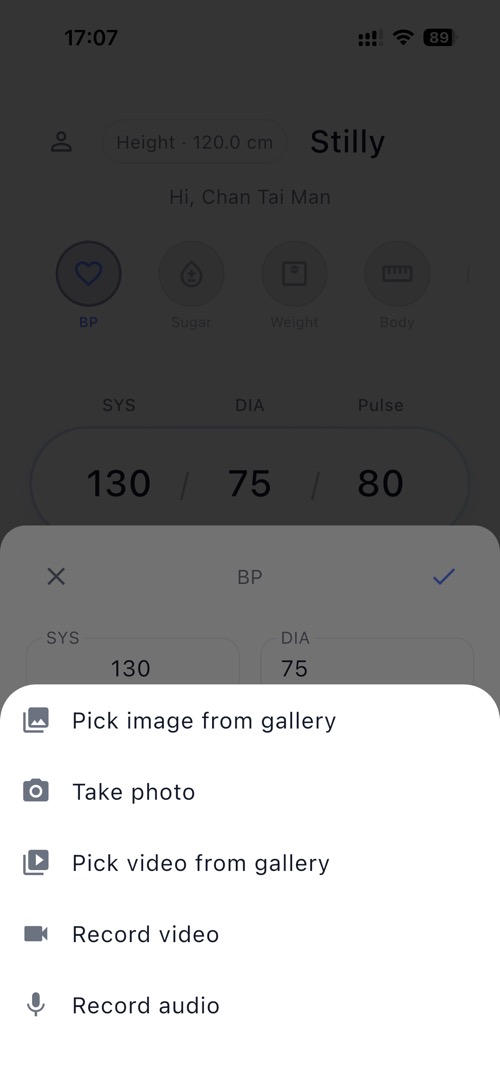
3 Adding Media to Blood Pressure Records
Test the media attachment feature when entering a blood pressure reading..
- Open the BP input bottom sheet
- Tap Add Media
- Choose one of the available options:
- Pick image from gallery
- Take photo
- Pick video from gallery
- Record video
- Record audio
- The selected media will be attached to the current record
- Tap ✓ to save the entry
Media Privacy
All media files are stored locally on the device.No media is uploaded or transmitted to external servers.
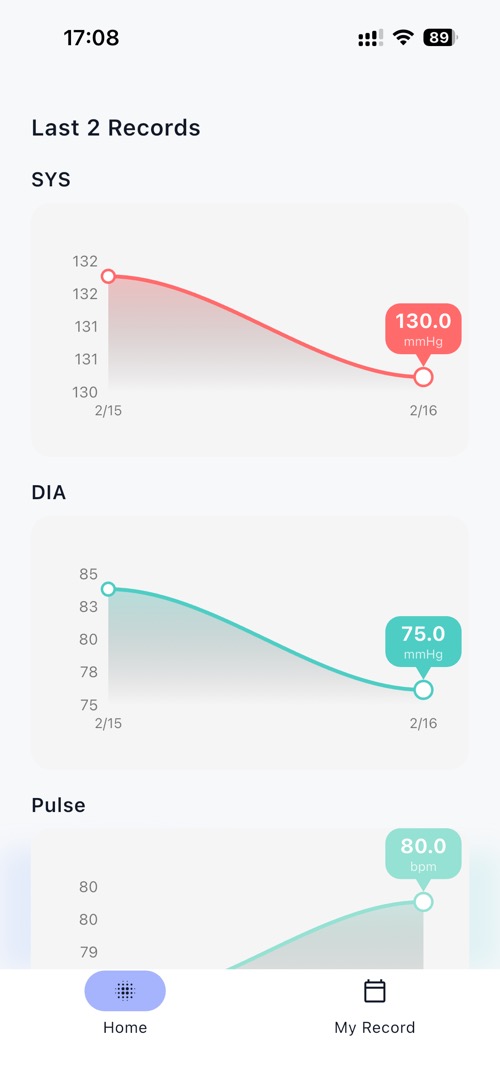
4 Viewing Blood Pressure Trends
Mini charts appear automatically once at least two records are entered.
- Enter two or more blood pressure readings
- Return to the Home screen
- The mini trend charts will appear below the latest record card
- Separate charts are shown for SYS, DIA, and Pulse
- The charts display recent values and trend direction
Data Visualization
These charts update automatically when new records are saved.
5 Blood Pressure Calendar View
Navigate through blood pressure records using the calendar view.
- From the bottom navigation bar, tap My Record
- Ensure the BP category is selected
- The monthly calendar view will open
- Dates with recorded readings are highlighted
- Tap a highlighted date to display readings from that day
- Swipe left or right to navigate between months
Calendar Navigation:
The calendar allows reviewers to access historical records by date. Only dates with saved readings are highlighted.

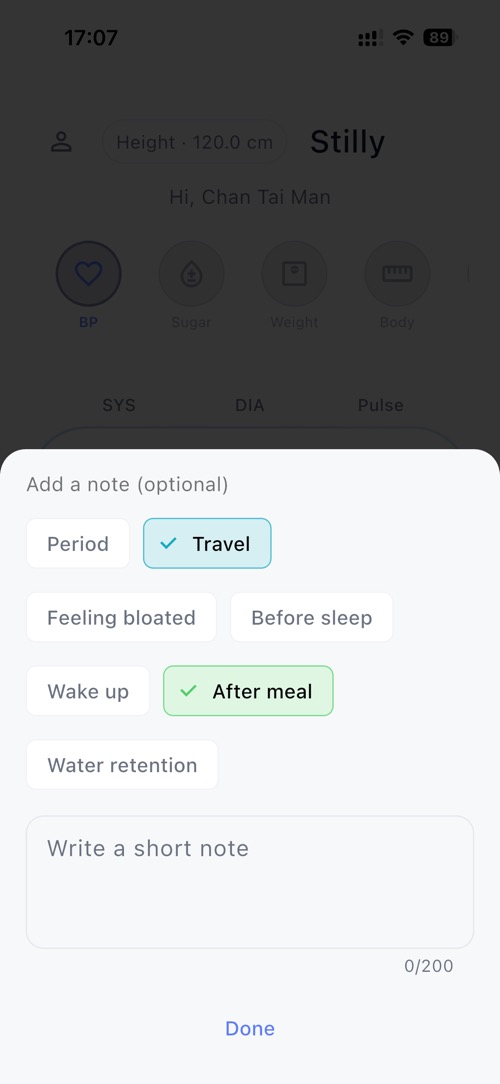
6 Adding Notes to Blood Pressure
Test the note feature when entering or editing a blood pressure record.
- Open the BP input bottom sheet
- Locate the Add a note (optional) section
- Select one or more contextual tags (e.g., Travel, After meal, Period)
- Optionally enter additional text in the note field
- Tap ✓ to save the record
Notes and Context Tags
Users can attach contextual tags and optional notes to each record. These notes are stored locally and linked to the corresponding entry.
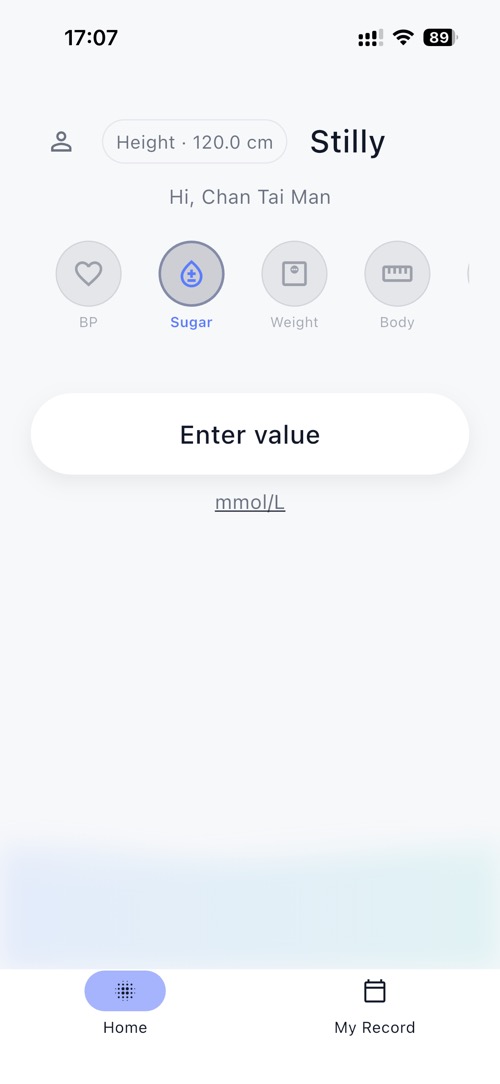
7 Logging Blood Glucose
Test the blood glucose logging feature.
- From the Home screen, tap the Sugar icon
- Tap Enter value
- Enter the glucose value (mmol/L)
- Select the measurement type (e.g., Fasting or Post-meal), if applicable
- Optionally add notes
- Tap ✓ to save
- The saved reading will appear in your history.
Glucose Reference Ranges:
The app displays informational reference ranges for fasting and post-meal readings. These ranges are provided for general reference only and do not constitute medical advice.
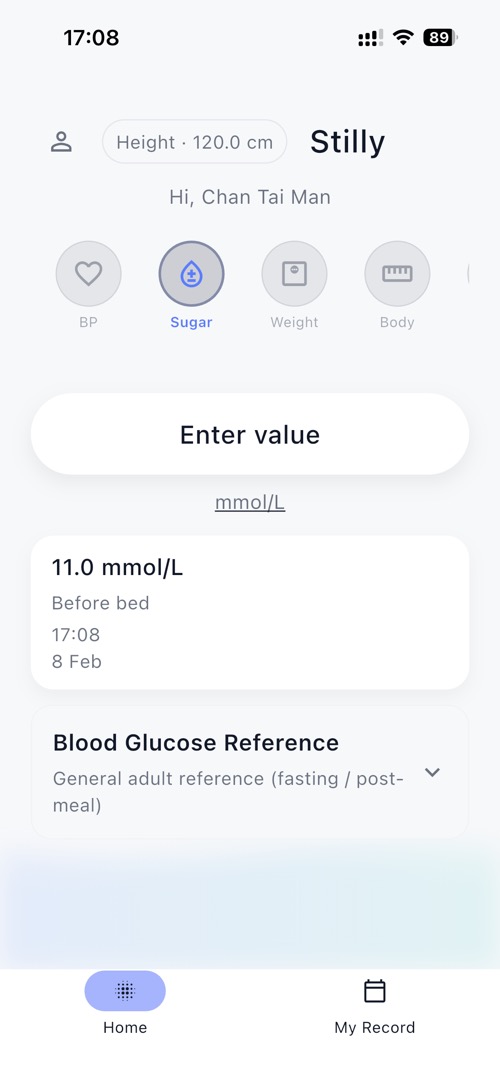
8 Viewing Latest Blood Glucose Record
Review the most recent blood glucose reading from the Home screen.
- From the Home screen, select the Sugar icon
- The latest glucose reading is displayed below the “Enter value” button
- View the measurement value (mmol/L), type (e.g., Before bed), time, and date
- Review any attached notes or contextual tags
- Reference information is shown below the reading
Latest Reading Display
The Home screen shows the most recent saved glucose entry. This section updates automatically when a new reading is recorded.
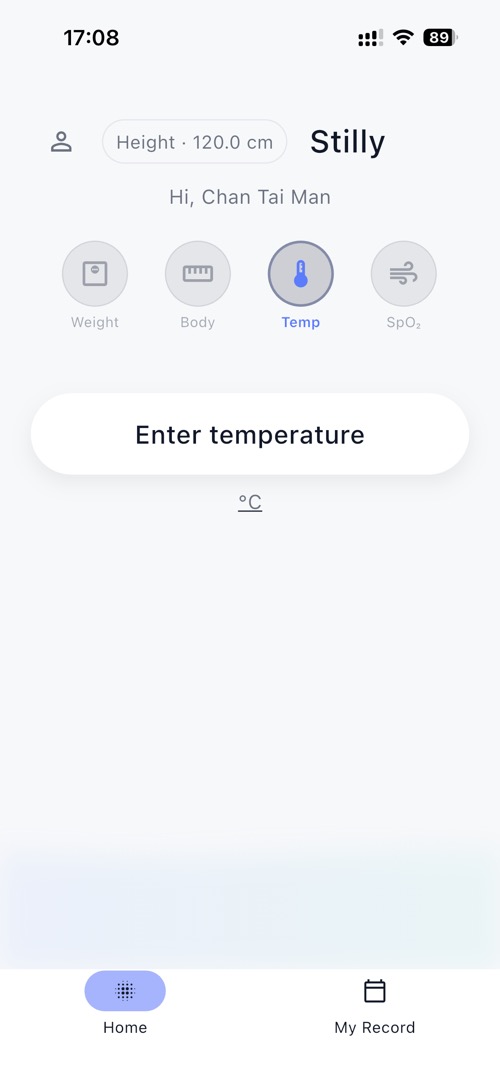
9 Logging Body Temperature
Test the body temperature logging feature.
- From the Home screen, tap the Temp icon
- Tap Enter temperature
- Enter the temperature value in °C
- Optionally add notes (e.g., measurement method or context)
- Tap ✓ to save
- The saved temperature reading will appear in your record history as well.
Temperature Tracking:
Temperature entries are recorded manually and stored locally. Reference information, if displayed, is provided for general context only.
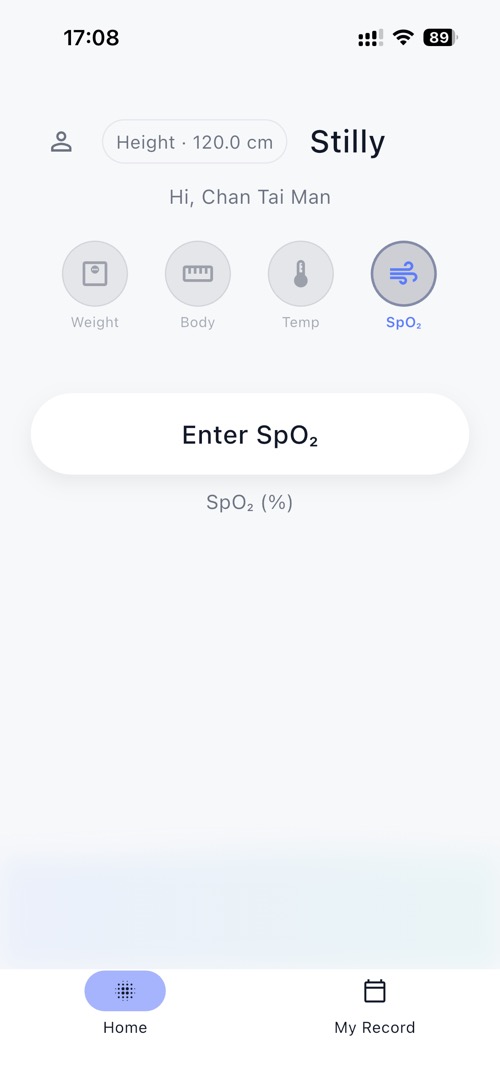
10 Logging Blood Oxygen (SpO2)
Test the blood oxygen logging feature.
- From the Home screen, tap the SpO₂ icon
- Tap Enter SpO₂
- Enter the oxygen saturation value (%)
- Optionally add notes
- Tap ✓ to save
- The saved SpO₂ reading will appear in your record history.
SpO₂ Information
SpO₂ values are manually entered by the user. Any reference information shown in the app is provided for general context only and does not constitute medical advice.
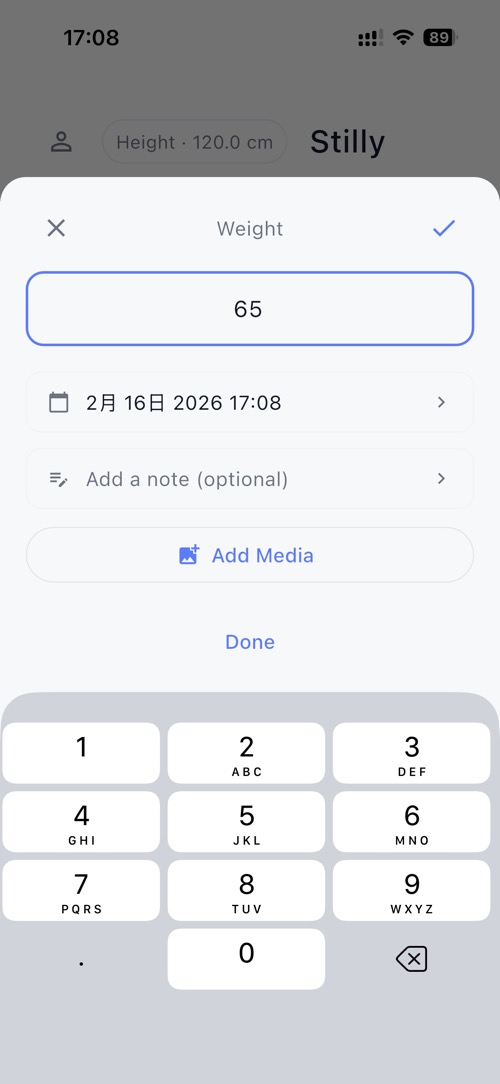
11 Logging Weight and BMI
Test the weight logging feature and automatic BMI calculation.
- From the Home screen, tap the Weight icon
- A weight input bottom sheet will appear
- Enter the weight value (kg)
- Adjust the date if needed
- Optionally add notes or media
- View WHO and Asian population reference ranges
- Tap ✓ to save
- BMI is calculated automatically based on the current height value shown at the top of the screen.
To modify height:
- Tap the Height value at the top (default: 170 cm)
- Update the height as needed
- The updated height will be used for future BMI calculations.
BMI Calculation:
BMI is calculated automatically using the recorded weight and the current height setting. Height can be adjusted by tapping the value displayed at the top of the screen.
Reference categories, if displayed, are provided for general context only.
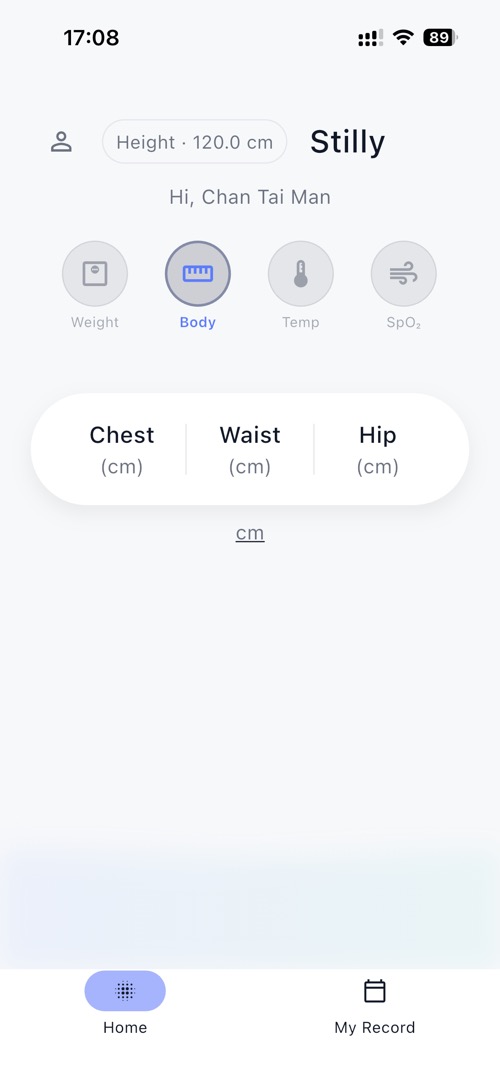
12 Body Measurements Overview
Test the body measurement tracking feature.
- From the Home screen, tap the Body icon
- Select a measurement type (e.g., Chest, Waist, Hip)
- Tap the input field to enter a value (cm)
- Save the entry
- Review previously recorded measurements in the history section
Trend Tracking
The Body section allows users to manually record measurements such as chest, waist, and hip circumference. All entries are stored locally and can be reviewed over time.
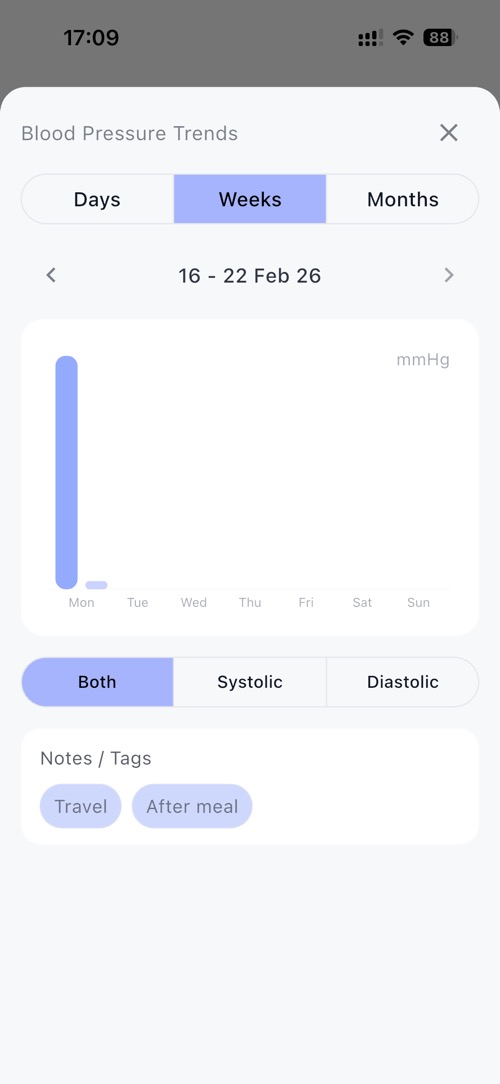
13 Viewing Data Charts
Explore chart visualizations for recorded measurements.
- From the bottom navigation bar, tap My Record
- View charts for different measurement types
- Tap the menu icon (⋮) at the top right
- Select Chart
- Switch between Days, Weeks, and Months
- Navigate between date ranges using the arrow controls
- Use the filter options (e.g., Both / Systolic / Diastolic) if available
Visual Analytics:
The chart view displays recorded values over time. Time ranges and measurement filters can be adjusted for review.
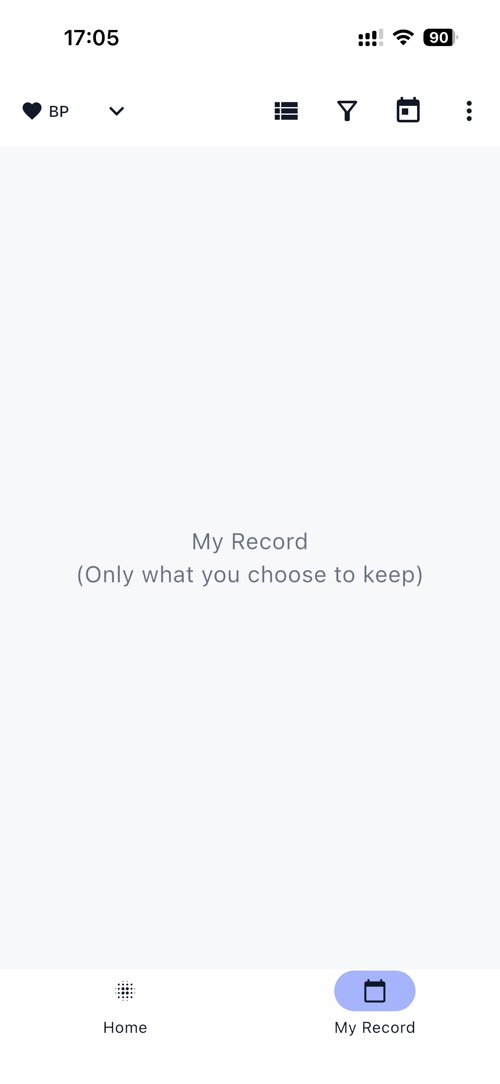
14 My Records List View
Review all measurements in list format.
- From the bottom navigation bar, tap My Record
- Select a measurement type (e.g., BP, Sugar, Weight)
- Records are displayed in chronological order
- Tap any record to view details
- Edit or delete entries if needed
If no records have been saved, the list view will display an empty state.
Record Management
The list view displays all saved entries for the selected measurement type. If no data is available, a blank state is shown until records are added.
15 Accessing Export Feature
Test the data export functionality.
- From the bottom navigation bar, tap My Record
- Select a measurement type if needed
- Tap the menu icon (⋮) at the top right
- Select Export Data
- The export configuration screen will open.
Export Privacy
Export files are generated locally on the device. No data is transmitted to external servers during the export process.
16 Configuring Export Options
After tapping Export Data, the export configuration screen will appear.
- Select the time range (e.g., Last 7 days, Last 30 days, This month, All records)
- Optionally choose a custom date range
- Select the export format (PDF, CSV, or XML)
- Review selections
- Tap Preview to generate a preview
- Generate the export file
Export Configuration:
The export screen allows selection of date range and file format. Generated files reflect only the selected data.

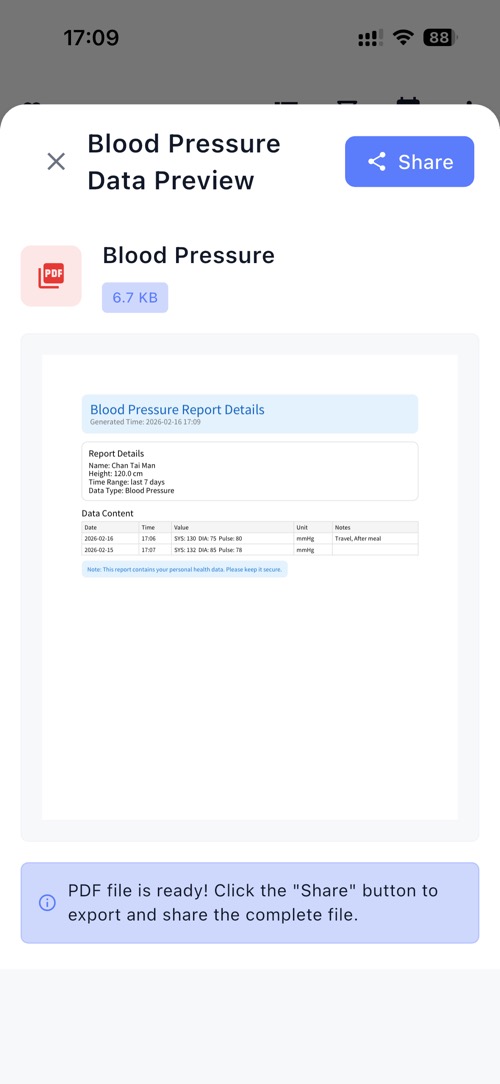
17 Previewing and Sharing PDF
Review the generated PDF and share it if needed.
- After tapping Preview, the PDF preview screen will appear
- Review the document content
- Confirm the included measurements and timestamps
- Tap the Share button at the top right
- Use the system share options to save or share the file
- The file size and document name are displayed on the preview screen.
PDF Preview
The preview screen displays the generated export file before sharing. Files are created locally and can be shared using the system share menu.
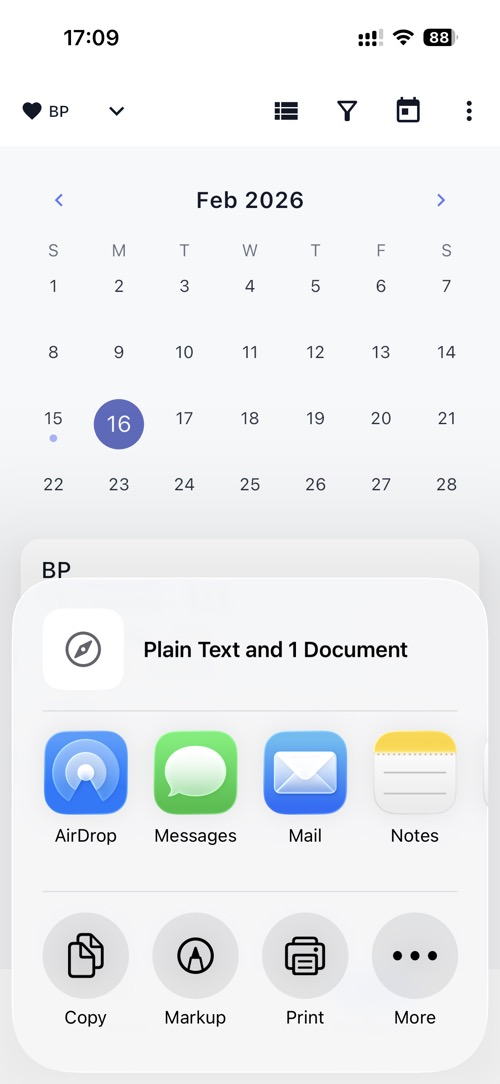
18 Sharing PDF Export
Use the iOS share sheet to distribute the exported file.
- From the PDF preview screen, tap the Share button
- The iOS share sheet will appear
- Select a sharing option (e.g., AirDrop, Messages, Mail, Save to Files, Print)
- Complete the sharing action using the selected app
The sharing process is handled by the iOS system share interface.
System Share Sheet
The app uses the standard iOS share sheet to handle file distribution. Available options depend on the apps installed on the device.
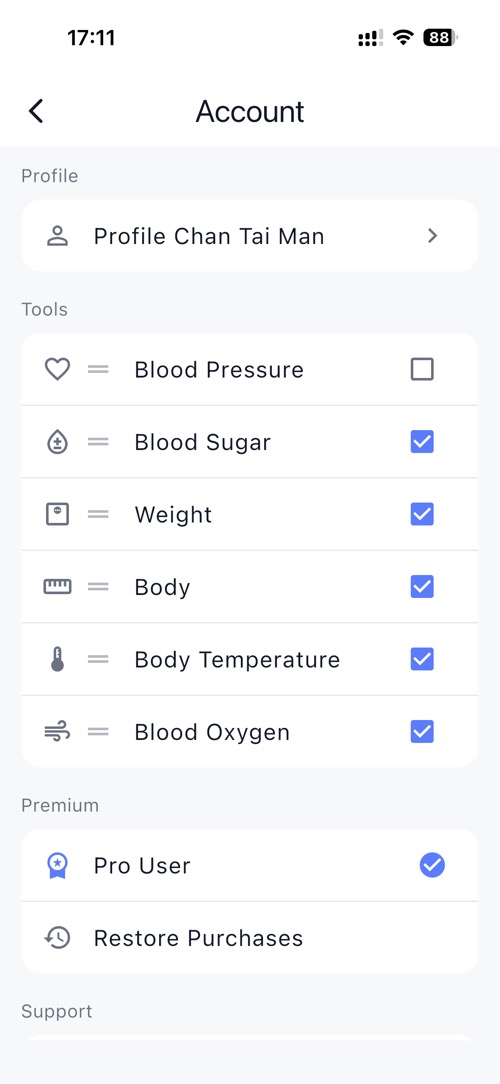
19 Account and Settings
Explore account information and app settings.
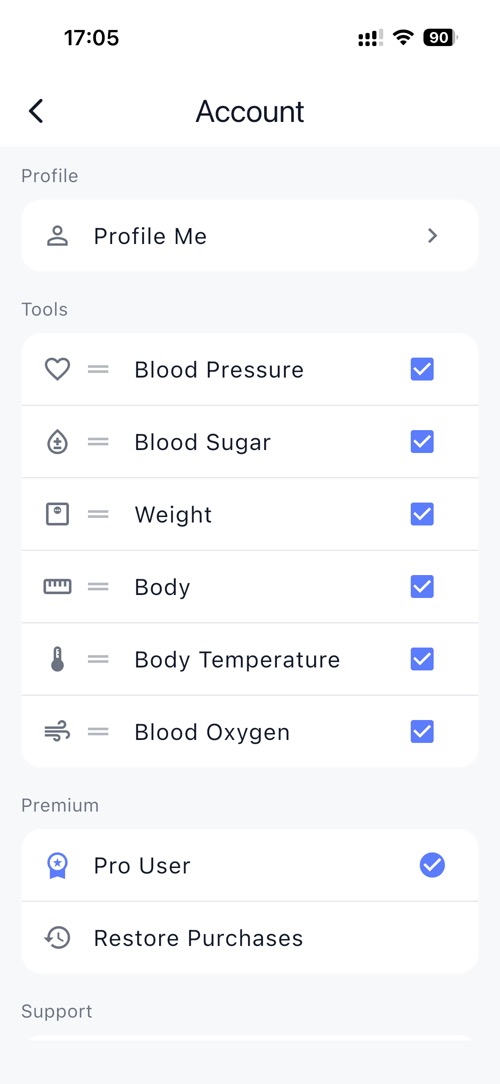
- From the Home screen, tap the person icon at the top left
- The Account page will open
- View or edit profile information
- Enable or disable measurement tools
- Check Pro status or restore purchases
- Access legal information such as Privacy Policy and Terms
Settings Options:
The Account page provides access to profile settings, feature controls, and purchase status. Changes made in this section update the app configuration.
20 Profile Information
Manage profile settings and support multiple users.
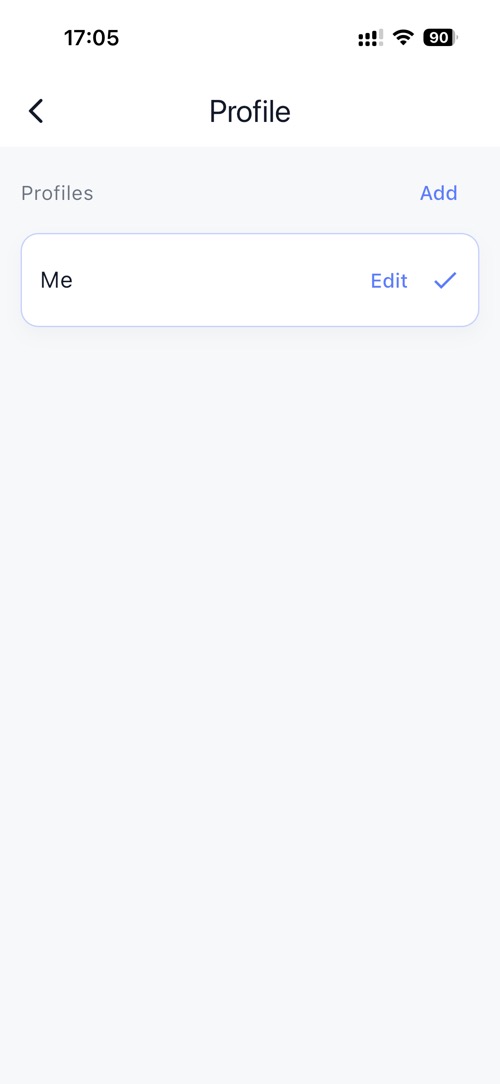
- From the Account page, tap Profile
- View the list of existing profiles
- Tap Add to create a new profile
- Tap Edit to modify an existing profile
- Select a profile to make it active
Each profile maintains its own measurement records and settings.
Height and other profile information are used for calculations such as BMI.
Profile Privacy
The app supports multiple profiles. All profile data is stored locally on the device and separated by profile. Profile information is optional and used for calculations and exports when applicable.
21 Customizing Appearance
Test the appearance customization options.
- From the Home screen, tap the person icon at the top left
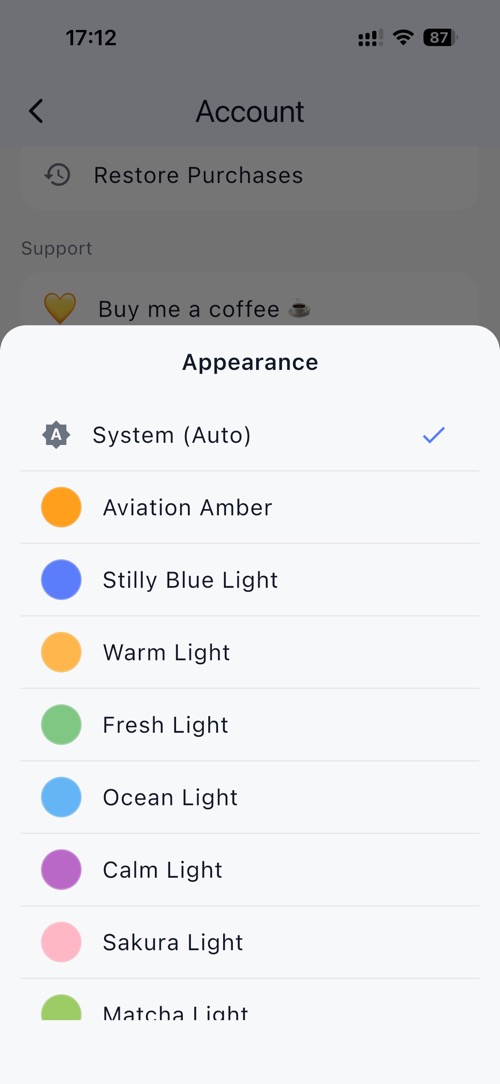
- On the Account page, open Appearance
- Select a theme option (e.g., System, Aviation Amber, Stilly Blue Light, Warm Light, etc.)
- Observe the interface update immediately
- Theme preferences are saved automatically.
Theme Support
The Appearance section allows users to select different color themes. The app also supports system-based theme selection (Auto).
22 Language Selection
Test the multi-language support feature.
- From the Home screen, tap the person icon at the top left
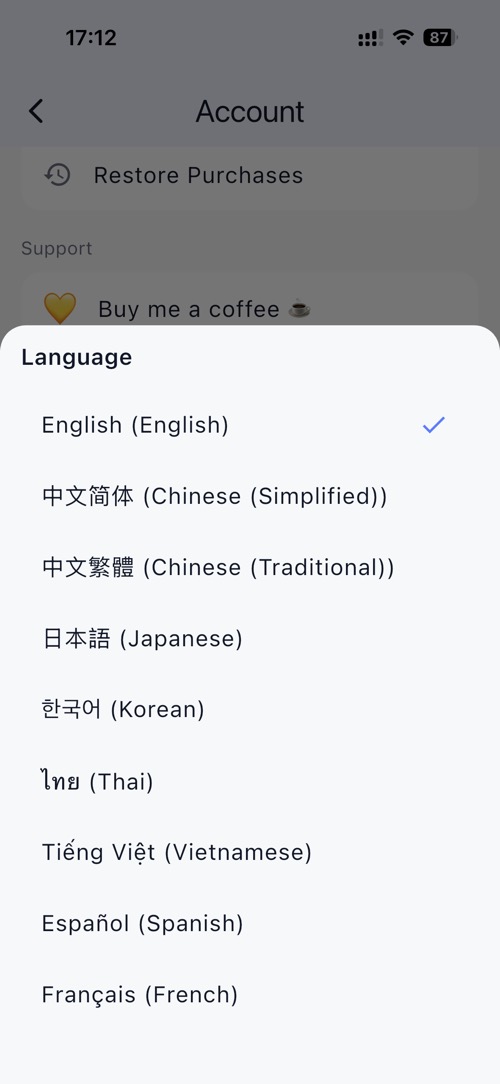
- On the Account page, open Language
- View the list of available languages
- Select a different language
- Observe the interface update immediately
- The selected language is applied across the app.
Localization:
The app supports multiple languages. Language changes are applied instantly within the interface.
24 Managing Tool Visibility and Order
Control which measurement tools are shown and adjust their display order.
- From the Home screen, tap the person icon at the top left
- On the Account page, locate the Tools section
- Use the checkboxes to enable or disable specific tools (e.g., Blood Pressure, Blood Sugar, Weight, Body Temperature, Blood Oxygen)
- Drag the reorder handle (≡) to change the display order
- The updated order will be reflected on the Home screen
Changes take effect immediately.
Tool Configuration:
The Tools section allows users to customize which measurement categories are visible in the app.